In this article you will learn how to configure Microsoft AD FS to set up Flexopus.
Step 1: Trust party setup
- In the AD FS management console, select the Relying Party Trusts folder.
- In the 'Actions' sidebar, click on the default setting Relying Party Trust and click Start. This opens the Add Relying Party Trust Wizard.
- Select Data Source
Import data about the relying party published online or on a local network.
- Federation metadata address (host name or URL)
https://{your-flexopus-domain}/internal-api/auth/integrations/saml2/metadata
Note: Replace {your-flexopus-domain}. (e.g. demo.flexopus.com) - Display Name
Flexopus - Choose Access Control Policy
Permit Everyone
(Depending on your internal policies, you can also select another suitable policy.) - Ready to add Trust
You can skip this step and the 2 following steps. Complete the wizard afterwards.
Step 2A: Setting the "Claim Rule"
- Edit Claim Issuance Policy...
- Choose Add rule.
- Choose Send Claims Using a Custom Rule.
- Set the following custom rule:
c:[Type == "http://schemas.microsoft.com/ws/2008/06/identity/claims/windowsaccountname", Issuer == "AD AUTHORITY"]=> issue(store = "Active Directory", types = ("http://schemas.xmlsoap.org/ws/2005/05/identity/claims/upn", "http://schemas.xmlsoap.org/ws/2005/05/identity/claims/name", "http://schemas.xmlsoap.org/ws/2005/05/identity/claims/givenname", "http://schemas.xmlsoap.org/ws/2005/05/identity/claims/surname", "http://schemas.xmlsoap.org/ws/2005/05/identity/claims/emailaddress", "jobtitle", "department"), query = ";userPrincipalName,displayName,givenName,sn,mail,title,department;{0}", param = c.Value);
- Repeat step 1, 2 and 3
- Set the following custom rule:
c:[Type == "http://schemas.xmlsoap.org/ws/2005/05/identity/claims/upn"] => issue(Type = "http://schemas.xmlsoap.org/ws/2005/05/identity/claims/nameidentifier", Issuer = c.Issuer, OriginalIssuer = c.OriginalIssuer, Value = c.Value, ValueType = c.ValueType, Properties["http://schemas.xmlsoap.org/ws/2005/05/identity/claimproperties/format"] = "urn:oasis:names:tc:SAML:2.0:nameid-format:persistent");
Step 2B: Manual setting of assignments
- Edit Claim Issuance Policy...
- Choose Add rule.
- Custom Rule Type
Send LDAP Attributes as Claims
- Select basic attributes and in the next step Active Directory. Then set assignments for UPN, Name, Given Name, Surname and E-Mail-Adress. Optionally, you can also perform this step for Jobtitle and Department.
LDAP Attribute Outgoing Claim User-Principal-Name UPN Display-Name Name Given-Name Given Name Surname Surname E-Mail-Address E-Mail-Address Department Department Jobtitle Jobtitle - Afterwards, select Add rule again.
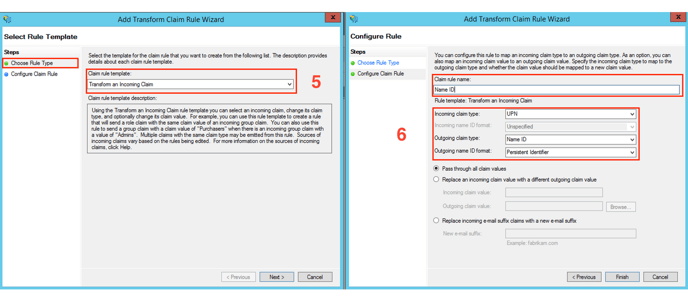
- Next, select Transform an Incoming Claim.
- In the last step, you set the Name ID assignment.
- To do this, set Incoming claim type to the source of the name id (e.g. UPN),
- Outgoing claim type to Name ID and
- Outgoing name ID format to Persistent Identifier.

Step 3: Flexopus setup
- Check your federation metadata url at Service/Endpoints.
- In the last step, add a new SSO provider in the global Flexopus settings under Authentication. Select SAML2 and enter your metadata URL https://{your-adfs-server}/{enpoint-url} and set up the label for the login button. Save the settings.

- Log out and test the connection to Flexopus.
(Optional) Step 4: Transmission of groups through the "memberOf" attributes
- Read the following article: https://help.flexopus.com/en/group-synchronisation-through-saml2
- Edit Claim Issuance Policy...
- Choose Add rule.
- Custom Rule Type
Send LDAP Attributes as Claims - Select basic attributes and in the next step Active Directory. Add the following attribute:
LDAP Attribute Outgoing Claim Is-member-Of-DL memberOf 

- Select the following option in Flexopus:

- Check whether the groups have been synchronised after a new login.
If you have set 2A, you can use the following code:
c:[Type == "http://schemas.microsoft.com/ws/2008/06/identity/claims/windowsaccountname", Issuer == "AD AUTHORITY"] => issue(store = "Active Directory", types = ("memberOf"), query = ";memberOf;{0}", param = c.Value);
R0015